3 easy diy costumes
October 11, 2016
I think my love of costumes originated from my Mom. When I was a child, my Mom would make the BEST costumes for us kids. Using creativity and things around the house, she would always come up with the most unique costumes. And the costumes weren’t just for the kids, my Mom and Aunts (Mom’s sisters) would also wear costumes they made. We decided to make simple, diy costumes based on the kids in my Pumpkin Fun fabrics. These are super easy with loads of cuteness. Find the directions on how we made these below.


Directions:
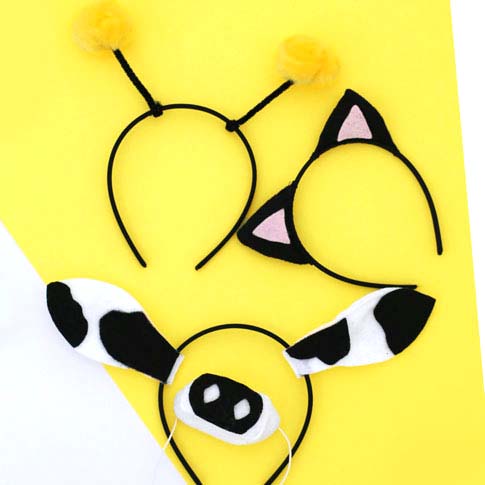
Bumblebee Tutorial Supplies:
– 2 black pipe cleaners
– 1 Black head band
– Pack of Creatology Pom Poms, Two Big Yellow Pom Poms
– 1 Pair of white stockings, get the biggest size you can find.
– 12 Gauge Aluminum Wire Silver
Instructions:
1. Antennas: Attach the two large yellow pom poms to the pipe cleaners. We attached the pom poms by taking an inch off of the black covering on the end of the pipe cleaner. (You should have an inch of wire showing). Wrap the silver part of the wire around the pom pom. Fluff the pom poms out to conceal the wire.
a. Decide how long you would like the antennas to be on the head band. Secure the antennas to the head band by wrapping the pipe cleaners around the headband. Cut off the excess.
2. Wings: We fashioned the wings out of 12 Gauge Aluminum wire.
a. We made a “figure 8” out of the wire. The “figure 8 wire” needs to be in porportion to the size of the person you’re making the wings for, so do not cut the wire until you have the wings fashioned to the size that works.
b. Once you have the size you would like of the figure 8 wire, wrap the excess wire around the middle of the figure 8, until it is sturdy. Then cut off the excess wire. Put tape around the center of the figure 8 wire to keep the wire from poking the one that wears it.
c. We used white stockings to cover the wings. Cut the white stockings at the top of each of the leg portions, so that it looks like you have two extra long knee high socks.
d. Place each of the stockings over the two ends of the figure 8 wire, until it is covered and they meet in the middle.
e. You will have excess stocking, where the stockings meet in the middle of the figure 8 wire. You need to mark where there is excess with a pen, remove the stockings and cut the excess.
f. After you cut off the excess, you need to make a 1/2 inch slit in the center of the top of your stocking. It should make two flaps at the top of each stocking.
g. Place the stockings back on each side of the wire figure 8. The flaps that you just previously cut should be meeting in the middle of the wire figure 8.
h. Tie the flaps of opposite stockings together around the wire, I took excess stocking and wrapped it around the middle of stocking covered wire figure 8, just to make it look neater,
i. Now you have wings, you can use a pen to fasten them on the the back of wearer.
And now you’re a bumble bee!
Cat Headband Tutorial Supplies:
– One 9 x 12 black felt square
– One 9 x 12 pink felt square
– 1 Black Headband
– Pillow filler
Instructions:
1. Draw your cat ears on a piece of card stock paper. You will need to draw an outer ear and the small inner ear. (Look at the example, the outer ear is the black part, the inner ear is the pink part). These will serve as your templates.
2. Cut out the paper templates.
3. Place the outer cat ears template over the black felt square. (You can hold it in place with your thumb).
4. Cut out the outer ear template on the black felt. You will need a total of four outer ear cutouts.
5. Now place the inner ear template over the pink felt, you will need two inner ear cut outs.
6. You should have four outer cat ears. You will pair the outer cat ears together.
7. Sew two of the outer ear cut outs together, leaving the bottom of the ears open. Do the same thing to the other other 2 cut outs.
8. Flip the ears outside in so that the seams you just sewed are on the inside.
9. Place a small amount of pillow filler in each ear.
10. Sew the bottom of the ear completely closed.
11. Now place your pink inner ears felt cutouts on the two black ears you just made. You can secure them with glue or you can sew them with pink thread and a needle.
12. At this point you should have two black and pink cat ears.
14. Decide where you would like the ears places on the head band and mark each end of each ear.
15. We will now attach the ears to the headband. You can use hot glue or sew.
16. We attached the ears to the headband by running the thread through the bottom of the ear, and looping it around the headband, several times until it became secure. Do this for the other ear.
Cow Costume Tutorial Supplies:
– One 9 x 12 white felt square
– One 9 x 12 black felt square
– 1 black headband
– One pack of elastic
– 1 white T-shirt
– One bottle of black fabric paint
– Paint brushes
Instructions:
1. Draw the cow ears on a piece of card stock paper, you need to draw only one ear.
2. Cut out your ear drawing. You now have a template.
3. Place your cow ear template on your white felt square, cut out 4 white cow ears using this template.
4. Pair the cow ears together, you should have two cow ears. Sew the ears together with a 1/4 inch inseam. Leave the bottom of the ears un sewn by a 1/2 inch. Since you’re going to slide the ears on the headband you need a slit on the bottom of each ear for the head band to slide through, we left the bottom of the ears unsewn on each side by 1/2 inch.
5. Place your fingers 1 inch from the bottom of the ears and pinch, you’re going to sew this slight pinch, making the ears curve in a little. This pinch should be an inch from the bottom in the middle of the ear. Do this on both ears. This will make the ears stand up on your head.
6. Sew across the bottom of the ears, 1/8 of an inch from the top of the slit you left at the bottom.
7. Make the black patches to go on the cow ears. You can cut out the black patches from the black felt and place them on the ears based on your preference and taste. You can use fabric glue adhere them.
8. To make the cow nose, you need to draw a rectangle with curved edges. This serve as your template. (The size of the rectangle needs to be relative to the face of the person wearing the nose.) Use this template to cut out a rectangle with curved edges on the white felt square.
9. From the edge of white felt square ,cut a 3/4 inch wide strip that is the long enough to wrap around the edges of of the rectangle you cut out previously.
10. Pin the 3/4 inch wide strip around the edges of the rectangle with curved edges. You are going to sew these two pieces together. Once you’ve finished sewing them together, cut off any excess.
11. You need to draw a rectangle with curved edges that is smaller than the first rectangle. It needs to fit inside of it, this is going to be the snout. (Look at picture above for a reference). This will serve as a template.
12. Use this template and cut out a rectangle on the black felt.
13. Once it is cut out, make nostrils in the black felt rectangle, make a simple hole with scissors.
14. Use fabric glue to place the black felt rectangle on the front of white rectangle portion.
15. Your snout is finished. On each side of the snout place a small hole at the edge of the side of the snouts.
16. Run the elastic through each hole and tie a knot. (make sure it’s not too loose, and not too tight on the face.)
17. Take the white shirt, use a pencil and draw the areas you would like to place the black patches.
18. Once you’ve decided where you would like to place the black patches, now you can paint.
(photos by Kelle)