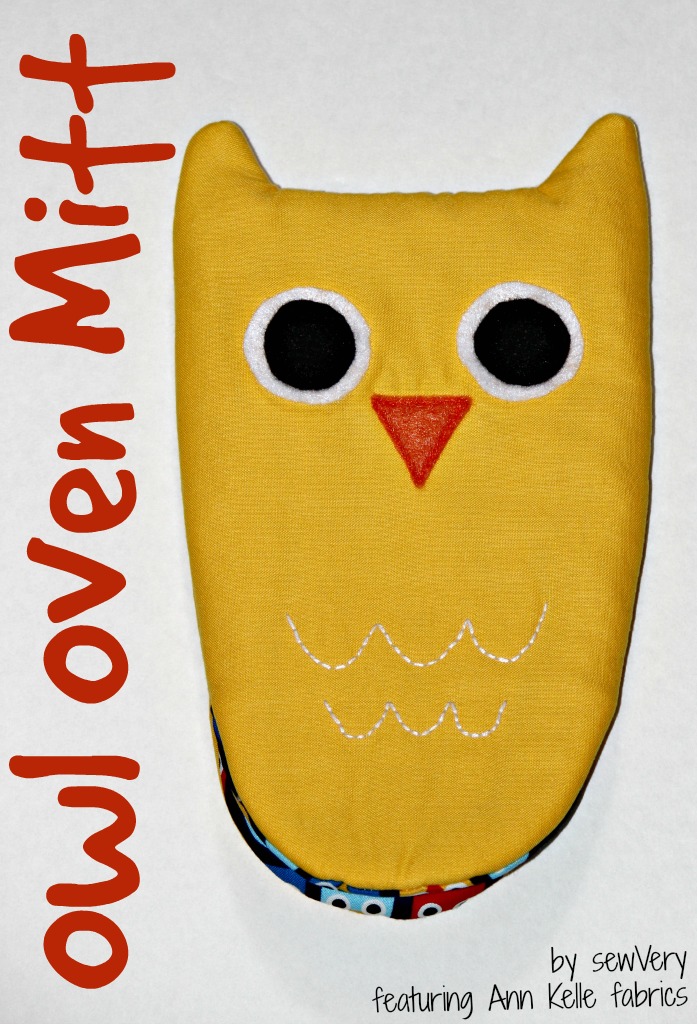
owl oven mitt sewing tutorial
February 21, 2017
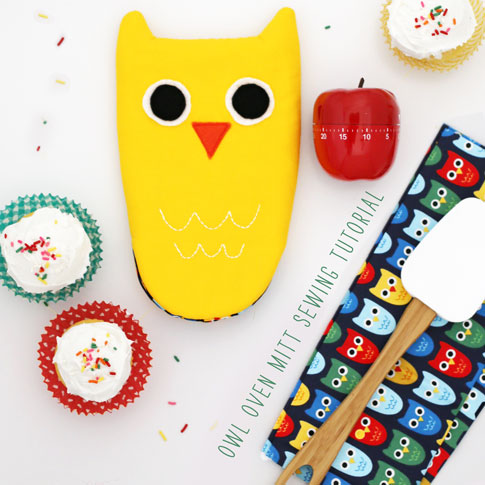
I’m all for having lots of fun in the kitchen! And this little owl is sure to bring a smile to your face. My owls from my Woodland Pals 2 collection served as the inspiration for this oven mitt. I like to think of him as my little sidekick in the kitchen;) Find the FREE tutorial below.

We lined this guy with my Woodland Pals 2 owl fabric.


(photos by Kelle)
SUPPLIES:
- Download the Owl Oven Mitt Pattern
- 2 each – 9″ x 12″ pieces of Woodland Pals 2 in Primary by Ann Kelle for Robert Kaufman for Lining
- 2 each – 9″ x 12″ pieces of Yellow Kona Cotton for Outer Mitt
- 2 each – 9″ x 12″ pieces of cotton batting
- 2 each – 9″ x 12″ pieces of Pellon 975 Insul-Fleece or thick terry cloth (like 21 ounce terry cloth from Shannon Fabrics)
- 2 each – 9″ x 12″ pieces of Pellon ShapeFlex SF101
- White, black, and orange felt scraps for eyes and nose
- Thread
- Glue stick
- Fabric marking pen
- Wooden chopstick for turning
- Iron
- Sewing machine
- Scissors
- Pinking shears
- White embroidery floss
- Embroidery straight needle
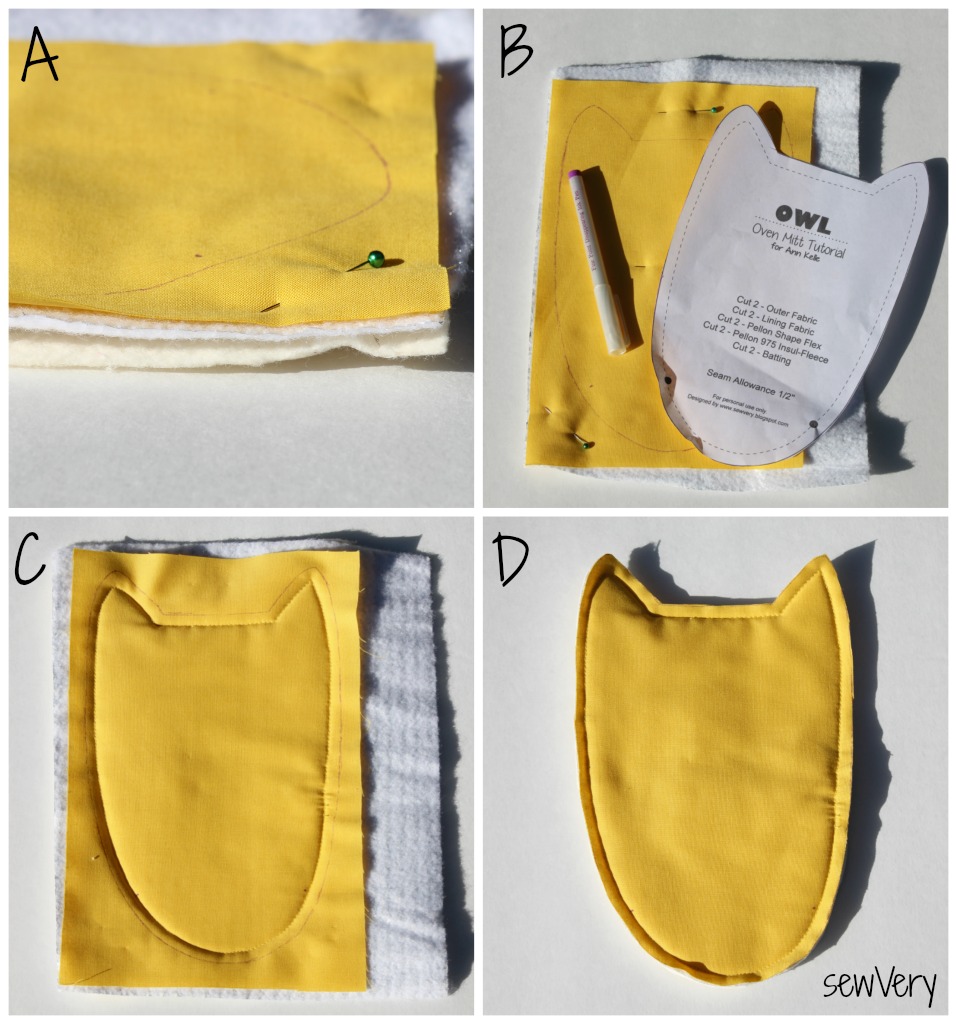
Begin by fusing the Pellon ShapeFlex to the wrong side of the two Woodland Pals fabric pieces for the Lining. Next, download and assemble the pattern piece. Use the pattern piece to cut two mirror images for the lining (A).
TIP: Stack the Lining fabrics right sides together with interfaced side up. Using a fabric marking pen, trace around the pattern piece. Cut out the shape with regular scissors. This is easier, in my opinion, than cutting the sharp corners around the ears with a rotary cutter.
After cutting out the Lining pieces, be sure to use a fabric marking pen to mark the location of the large dots on the wrong side of one Lining piece. These dots indicate the start and stop point for sewing.
Place the two Lining pieces right sides together and pin. Using a 3/8″ seam allowance, sew around the perimeter of the Lining starting at one large dot and ending at the other large dot but leaving a 3″ opening along the side for turning later. Trim the sewn edges using pinking shears and clip the corners along the top of the head and ears (B).
Turn the Lining right side out press lightly (C). Set aside.

Next, prepare the Outer fabrics by layering the cotton batting on bottom, Insul-Fleece (or terry cloth) in the middle, and Yellow Kona Cotton on top (A).
Pin all three pieces together and use a fabric marking pen to trace around the pattern piece onto the Outer fabric (B). Repeat steps A and B making sure to trace a mirror image of the pattern on the second stack.
Using the drawn line as a guide, sew all three layers together using a 1/4″ seam allowance. The stitched line should be on the inside of the drawn shape as shown below (C).
Use regular scissors to trim the batting and insulation as close to the seam without cutting the seam. This reduces bulk in the finished seam. Then cut the Outer fabric along the drawn line (D). Repeat steps C and D for the second Outer piece.
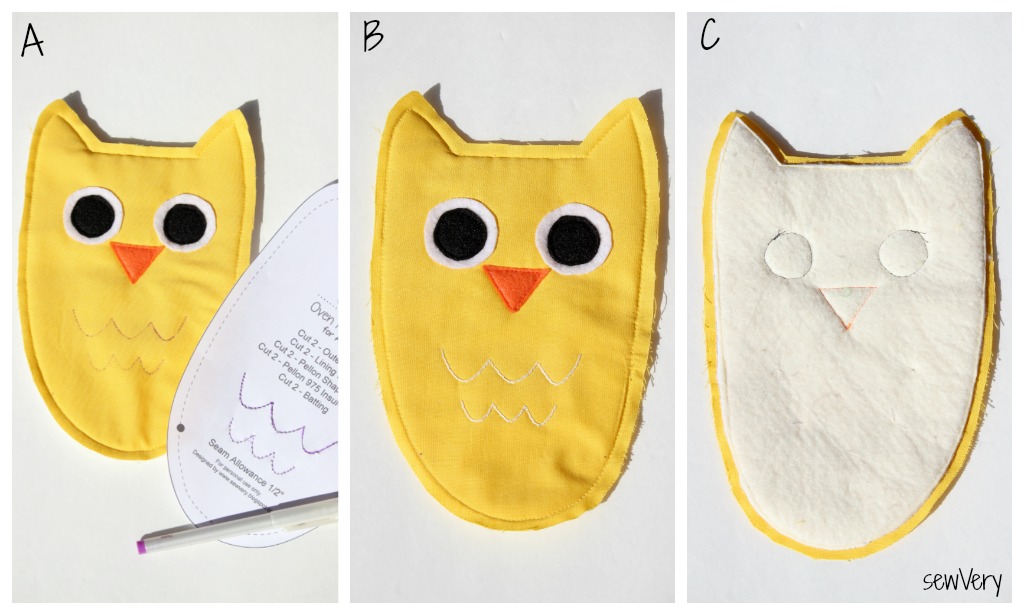
Use the pattern pieces to cut out 2 white Outer Eyes, 2 black Inner Eyes, and 1 orange Nose. Place these items on one Outer piece until you are happy with the placement. Use a washable glue stick to temporarily secure each piece in place. Sew the eyes into place using black thread and the nose using orange thread. Next, place the pattern piece on the right side of the Outer piece with the face. Use a fabric marking pen to trace over the feather outlines on the pattern piece (A).
TIP: Use a fine point fabric marking pen to pierce the fabric and leave a series of dots along the feather line as a guide.
Hand sew, using a stitch of your choosing, along the feather markings with 3 strands of white embroidery floss (B).
View of the Owl Oven Mitt front from the wrong side. Note how the batting and insulation are trimmed from the seam allowance (C).
Place the two Outer pieces right sides together and pin. Make sure to transfer the large dot markings to one Outer piece now if you haven’t done so previously (A).
Beginning at one large dot marking, sew around the sides and top of the owl shape using a 3/8″ seam allowance. Sew until you reach the other large dot. Be sure to back stitch at the beginning and end (B).
Trim the sewn edges using pinking shears, and clip the corners where the top of the owl head and ears meet. Insert the Lining between the two Outer pieces so that right sides of the Lining and Outer pieces are together (C).
Match the ends and the side seams and pin together (D).
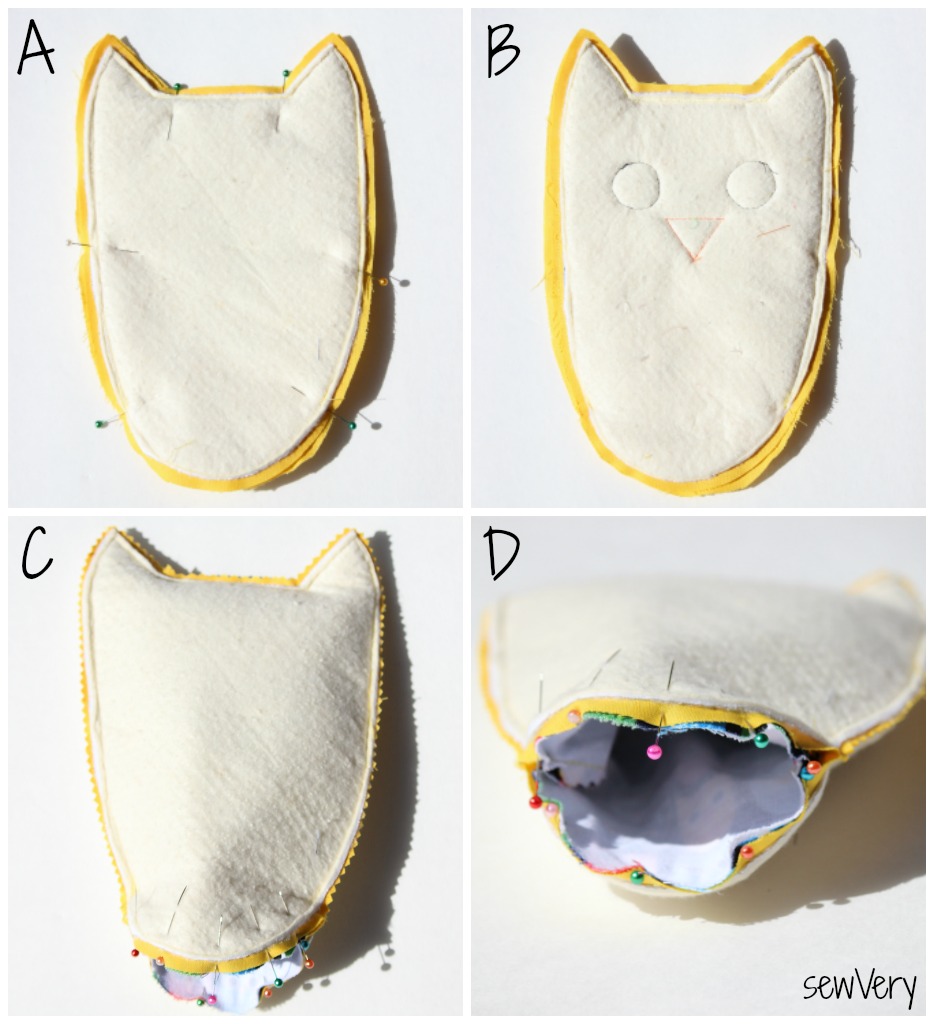
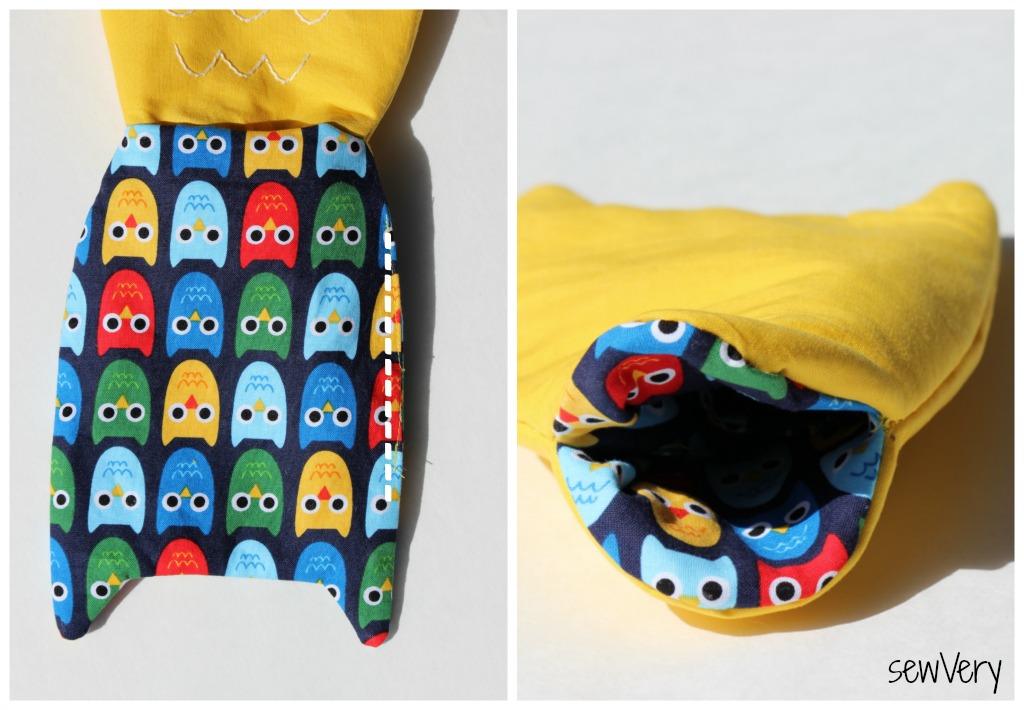
Using a 3/8″ seam allowance, sew from one side seam to the other by starting and stopping as close to the side seam as you can. You will not actually sew over the side seam and all the way around at one time. Sew together one end from side seam to side seam and then flip the mitt over and repeat for the other half of the mitt opening. Trim the seam allowance with pinking shears (A).
Pull the Lining out of the mitt and use the 3″ opening in the side of the Lining to turn the entire thing right side out (B).
Use a wooden chopstick or a strong metal knitting needle to work the ears of the owl out. This will take some muscle (the fabric is thick) and a few minutes to get everything pushed out and smooth (C).
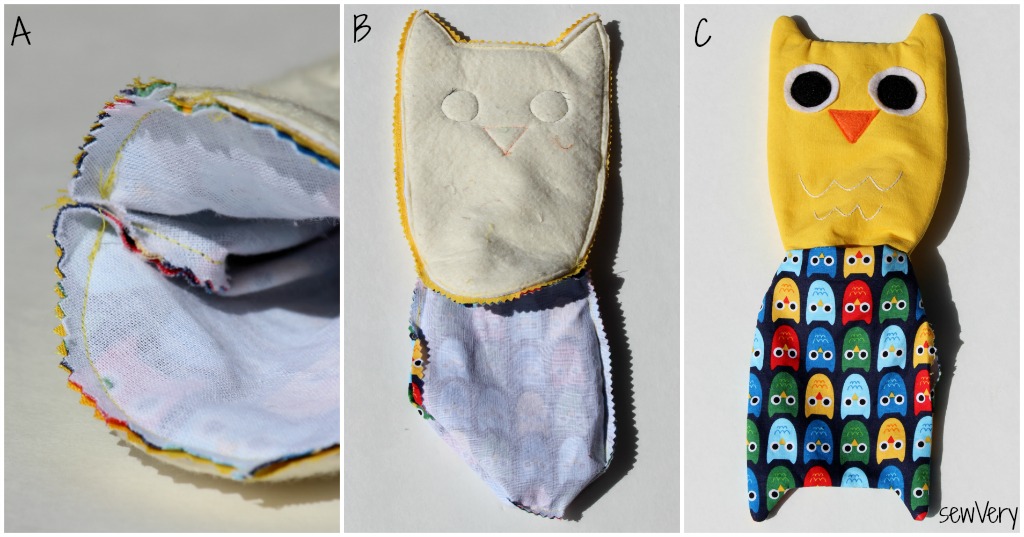
Press the Lining opening seams in and sew the opening closed. Next, push the lining back inside the mitt and use the wooden chopstick as needed to smooth out the fabric.
Iron the mitt well being sure to use a press cloth to protect the felt eyes and nose.
When using the Owl Oven Mitt to remove hot items from the oven, be sure to wear the mitt on your hand so the owl’s face is facing you. The plain side of the mitt should always be used to pick up the hot dish or tray.
