pouch sewing tutorial
November 10, 2015

For this free tutorial, we used my Rainbow Remix fabric. The free tutorial is at the bottom of the post.


Supplies
- Rainbow Remix by Ann Kelle fabric
- Coordinating Kona Cotton
- Interfacing (Pellon Shape Flex or Lightweight Fusible)
- 5″ zipper
- Thread
- Scissors
- Sewing Machine
- Iron and Ironing Board
- Chopstick or Bodkin
- Free Remix Pouch Tutorial Template – Download HERE
Assembly
Print out the Remix Pouch Tutorial Template. Here
1. Cut 2 Upper Outer pieces and 2 Zipper Tab pieces using the Rainbow Remix fabric and 2 Lower Outer and 2 Lining pieces using the solid Kona Cotton. NOTE: To make a Remix Pouch with a single outer fabric, simply use the Lining pattern piece for both the Outer pouch and the Lining.
2. Cut out 2 pieces of interfacing for each pattern piece. TIP: Cut the interfacing minus the 1/4″ seam allowance. This will help reduce bulk in the finished seams.
3. Fuse the interfacing to the back of each corresponding fabric piece. NOTE: If sewing a Remix Pouch with a single outer fabric, skip to Step 7.

4. With right sides together (RST), sew the straight edge of the Lower Outer to the long edge of the Upper Outer.
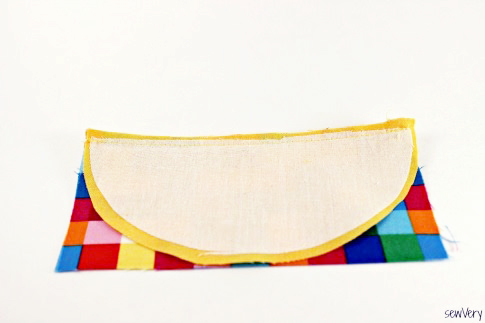
5. Press the seam down toward the Lower Outer and topstitch 1/8″ away from the seam. Repeat for the remaining Upper Outer and Lower Outer pieces

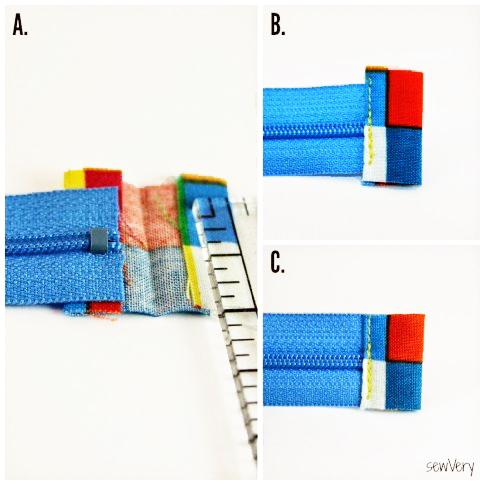
6. Create the 2 Zipper Tabs.
A. Lay out the fabric for each Zipper Tab.
B. Fold the Zipper Tab in half with RST and press.
C. Fold in each short end of the Zipper Tab approximately 1/4 ” with wrong sides together (WST) and press.
D. Fold along the center crease again and press well.

7. Cut the zipper so that it is 5″ long.


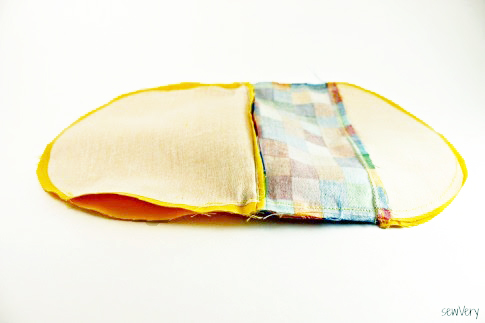
A. Flip the Outer piece and the Lining piece so they are now wrong sides together (WST). Press the seam.
B. Using a zipper foot, topstitch along the seam 1/8″ from the edge.
C. Line up the remaining Outer and Lining pieces with the zipper as done in Steps 10 and 11, then repeat Steps 12A and 12B for the other side of the zipper.

12. Unzip the zipper at least half way (not shown). With the zipper in the middle, line up the edges of the Outer pieces with RST being sure to match seams. Pin together.


14. Starting about 1 1/2″ down from the zipper on the Lining side, sew around the edge of the pouch using a 1/4″ seam. Do not sew through the Zipper Tabs (they should be just outside the seam allowance). Leave a 2″ to 3″ opening along one side for turning the pouch right side out.
15. Trim the edges if necessary and then clip the bottom curve on both the Outer and the Lining sides of the pouch. Be sure not to clip through the seam.

16. Turn the pouch right side out through the opening in the Lining. With the help of a wooden chopstick or bodkin, gently push out the seams of both the Outer and Lining sides of the pouch.

17. Close the opening in the Lining.
A. Press under the edges of the opening in the Lining and pin together.
B. Sew the opening closed using a 1/8″ or smaller seam.

18. Push the Lining back inside the pouch and using your fingers, gently push out the top corners of the pouch at the Zipper Tabs. Smooth out all the seams by finger pressing, then use the iron to thoroughly press both sides of the pouch for a nice, crisp finish.


[…] Pouch Sewing Tutorial, by Ann Kelle […]
[…] Love these rounded bottom zipper pouches from Ann Kelle. Click here for the tutorial. […]
[…] Pouch Sewing Tutorial by Ann […]